Contribute
Welcome! We're happy to see you contributing to the Knighthood Wiki! The following is a list of some guidelines to go over while creating or editing pages. Please take the time to look over these carefully before making any major contributions. If you have any other questions, you can ask them on the Official Knighthood Discord Server in the #wiki-discussion channel!
Before You Start: Visual Editor vs Source Editor
If you are simply tweaking some text on a page, Visual Editor an appropriate tool. However, it is highly recommended that you use the Source Editor for anything more complex, especially adding Templates and generally formatting data. This may seem daunting at first, but fear not! There are already many pre-made pages you can use as a guide!
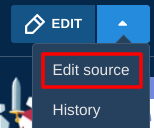
- To edit in Source Mode, just hover over the arrow next to the Edit button and select "Edit Source"
- You can also set your default editing mode to Source Editor by going to Special:Preferences and changing it under the Editing tab.
Wording
Referring to the Player
If the mechanic discussed involves things directly involving the player of the game (such as making menu choices or receiving items), use "The player"
- Example 1: "Islands in the Rift may have an option between two Choices that the player will have to choose before progressing"
- Example 2: "The player may receive Drops, Tomes, or Cores from Wooden Chests."
If the mechanic discussed involves the Knight character the player is controlling, (such as enemy targeting or armor effects), use "The Knight"
- Example 1: "This enemy will not attack the Knight if they are not in the front row."
- Example 2: "This core increases the Knight's armor by X%."
Linking to Other Pages
In Source Editor, use double brackets "[[ ]]" around the name of the wiki page you wish to link to. In Visual Editor, the first pair of brackets will open up a menu to allow you to search for the page you want to highlight.
- You can also make a link by highlighting the text and using Ctrl+K
- You can link to a Heading by putting a hash "#" connecting the main page name and the header name. For example,
[[Chests#Hero Chest]]
gives Chests#Hero Chest, which jumps directly to the "Hero Chest" header on the "Chests" page. - You can link to a different page than the text by using a pipe "|" (Shift+\) between the page link and the text you want to use as a link. For example,
[[Monsters|List of Monsters]]
gives List of Monsters
Pages and Templates
Making a New Page
Most new pages you will make will already have a sample page made for them. The fastest way to make a new page in the same category (i.e., a new Standard Monster), is to copy the source code over from the sample page and then replace the existing information with info for the new page. Make sure you have the Source Editing mode open on both pages.
- Make sure the URL for the new page has ONLY underscores for spaces (i.e. "Skeleton_Archer")
- Do NOT add the title or main image to the template (unless it is different from the Page Name), as this will be auto-filled based on the page name.
- The exception to this is to add a tabbed gallery, which will happen as more Heroes get skins. At the moment only a few Heroes have this feature.
- To add a tabbed gallery (see Eileen as an example), use the following code while editing the infobox:
- To add a tabbed gallery (see Eileen as an example), use the following code while editing the infobox:
- The exception to this is to add a tabbed gallery, which will happen as more Heroes get skins. At the moment only a few Heroes have this feature.
|image1=<gallery>
Image1.png|Image Description
Image2.png|Image Description
Image3.png|Image Description
</gallery>
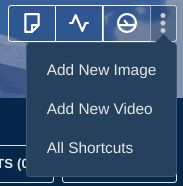
- If the appropriate image does not exist on the wiki, you may upload an image yourself by using the Add New Image option in the upper-right menu of most pages.
- Make sure the image follows the same format as other images (including capitalization and underscore):
- Hero: "Hero_HeroName.png"
- Monster: "Monster_Name.png"
- If you aren't sure of the image formatting, refer to the images that already exist at Special:ListFiles
- Make sure the image follows the same format as other images (including capitalization and underscore):
- Do NOT add a link to the monster type or resistances/weaknesses, this is also auto-formatted by the template.
Page Samples and Templates
Standard Enemy: Skeleton Archer | Template
Roaming Monster: Deadeye | Template
Hero: Ash | Template
Special Formatting
Rarity
Rarity can be specially colored using Template:Rarity. If no second parameter is given, it will return the rarity name.
Examples:
- {{Rarity|Unique}} Gives you: Unique
- {{Rarity|Legendary|Manganese}} outputs: Manganese
Monster Type
Monster type can be formatted to show the icon using Template:MType
Example: {{MType|Undead}} outputs: ![]() Undead
Undead
Event Icon
Display an icon for one of the Special Events by using Template:EventI
Example: {{EventI|Wintertide}} outputs: ![]()
Other Inline Icons
Status Effect and Damage Type (except Support) can be formatted to show the icon using Template:Icon
Example: {{Icon|Heavy}} outputs: ![]() Heavy
Heavy
You may also include a hyperlink using Template:IconHL
Example: {{IconHL|Burn}} outputs: ![]() Burn
Burn
Runic
Use Template:Rune to display words in the custom Runic font used in-game. See the Template page for extra formatting.
Example: {{Rune|ABANDON ALL HOPE}} outputs: ᚪᛒᚪᚾᛞᚩᚾ ᚪᛚᛚ ᚻᚩᛈᛖ
- Wiki meta


